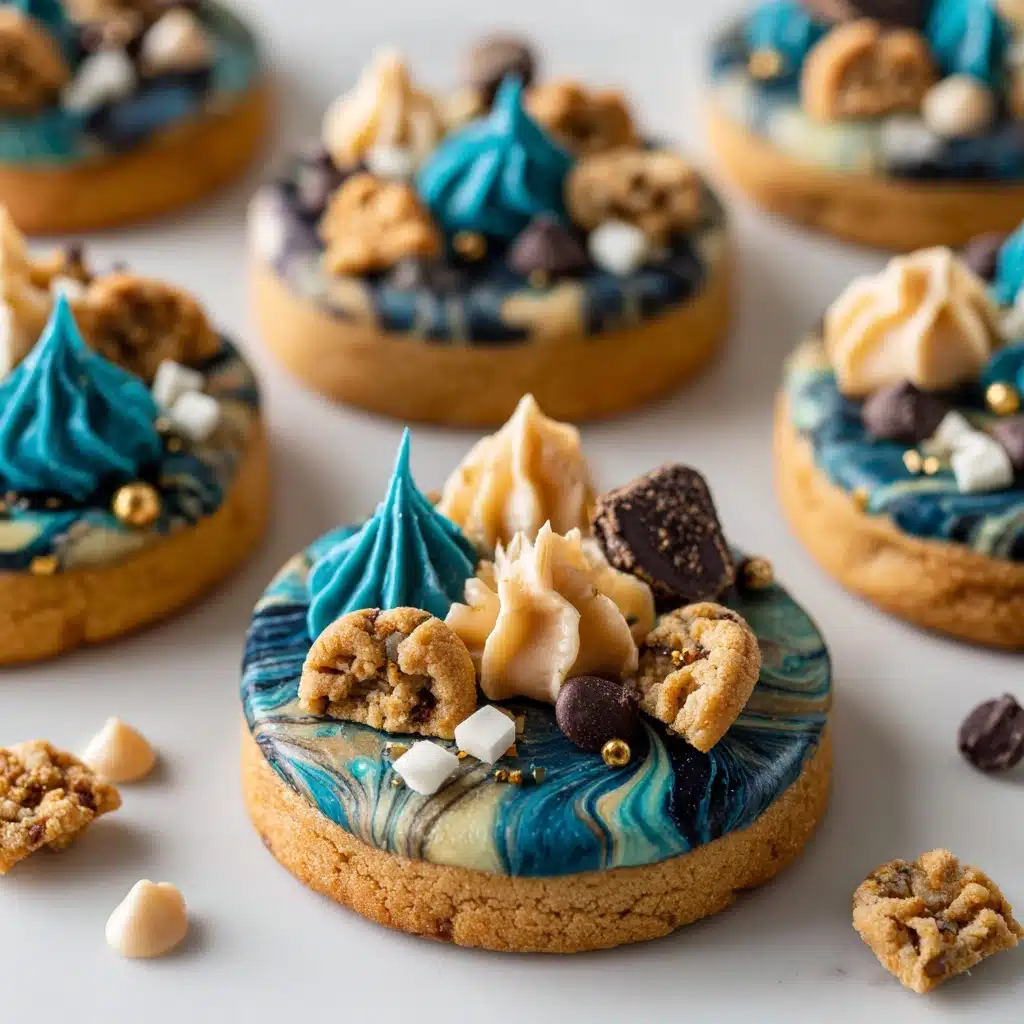
Cookie Monster Cookies Recipe
Let me introduce you to the ultimate bake sale showstopper: Cookie Monster Cookies. These whimsical, blue-tinted treats are every bit as fun to make as they are to eat, bringing together the best of chocolate chip cookies, Oreos, and playful candy eyeballs in one irresistible package. With a chewy center, a medley of cookies inside, and that signature Cookie Monster blue, these cookies are guaranteed to spark joy at birthday parties, themed events, or any time you want to make dessert just a bit more magical.
Ingredients You’ll Need
The beauty of Cookie Monster Cookies lies in their simplicity—the ingredients are pantry staples, but each one brings something special to the party. From velvety butter for richness to blue food coloring for that iconic hue, every element has a starring role. Here’s what you’ll need and why you shouldn’t skip a thing:
- Unsalted butter (1 cup, softened): Gives the cookies their tender, melt-in-your-mouth texture and a rich, buttery flavor.
- Brown sugar (1 cup): Adds a deep caramel note and helps keep the cookies perfectly chewy.
- Granulated sugar (1/2 cup): Balances sweetness and helps the edges brown just right.
- Large eggs (2): Bind the dough and add moisture for that chewy bite.
- Vanilla extract (1 tablespoon): Rounds out the flavors with a warm, aromatic touch.
- Blue gel food coloring (as needed): Achieves that iconic Cookie Monster blue—gel is best for vivid color without thinning the dough.
- All-purpose flour (2 ½ cups): Provides structure so your cookies are thick and soft, not flat.
- Baking soda (1 teaspoon): Ensures a gentle rise and tender crumb.
- Salt (1/2 teaspoon): Balances the sweetness and deepens the overall flavor.
- Mini chocolate chips (1 cup): Guarantees a little chocolate in every bite—mini chips distribute perfectly.
- Crushed chocolate chip cookies (1/2 cup): Adds crunchy, cookie-inside-cookie surprise.
- Crushed Oreos (1/2 cup): Brings a creamy, chocolatey punch and a fun cookies-and-cream vibe.
- Mini Chips Ahoy or other mini cookies (1/2 cup, whole or halved): Creates that playful, chunky look—save a few for pressing on top!
- Candy eyeballs (optional for decoration): The finishing touch for true Cookie Monster personality—kids (and adults!) love them.
How to Make Cookie Monster Cookies
Step 1: Prep Your Oven and Baking Sheets
Start by preheating your oven to 350°F (175°C) and lining two baking sheets with parchment paper. This simple step ensures your Cookie Monster Cookies bake evenly and come off the pan without a fuss. The parchment also keeps the bottoms golden without over-browning.
Step 2: Cream the Butter and Sugars
Grab a large mixing bowl and beat together the softened butter, brown sugar, and granulated sugar. You want to mix until everything is light, fluffy, and well combined—this should take about 2 to 3 minutes. Creaming is the secret to cookies that are soft and tender in the middle, with just the right amount of chew.
Step 3: Add Eggs, Vanilla, and Color
Crack in the eggs one at a time, mixing well after each addition. Stir in the vanilla extract for depth, and then add your blue gel food coloring. Start with a little and increase as needed until you reach your dream Cookie Monster shade. The color is bold and fun, setting the tone for the rest of the cookie magic.
Step 4: Combine the Dry Ingredients
In a separate bowl, whisk together the flour, baking soda, and salt. Gradually add this dry mixture to your wet ingredients, mixing just until combined. Be careful not to overwork the dough—stopping when you see the last streaks of flour will keep your cookies soft, not tough.
Step 5: Fold in the Fun Stuff
Gently fold in the mini chocolate chips, crushed cookies, and Oreos. This is where the Cookie Monster Cookies really come to life—every scoop is packed with chocolate, crunch, and cookies galore. Don’t be afraid to get creative here or sneak a few extra chips if you’re feeling wild.
Step 6: Scoop and Decorate
Using a cookie scoop or two tablespoons, portion out the dough onto your prepared baking sheets, leaving about 2 inches between each. For that signature look, press a few mini cookies and, if you like, some candy eyeballs into the top of each dough ball. The eyes bring the Cookie Monster to life, making these cookies extra delightful for kids of all ages.
Step 7: Bake to Perfection
Bake your cookies for 10 to 12 minutes, just until the edges are set but the centers still look slightly underbaked. Resist the urge to overbake—this is the trick to getting that soft, chewy texture. Once out of the oven, let the cookies cool on the baking sheet for 5 minutes before transferring them to a wire rack to finish cooling.
How to Serve Cookie Monster Cookies

Garnishes
For a showstopping finish, sprinkle your Cookie Monster Cookies with a few more mini chocolate chips and extra candy eyeballs right after baking. If you love a little sparkle, try a dusting of edible glitter or colorful sprinkles. These finishing touches make each cookie look like it leapt straight off the screen.
Side Dishes
Nothing pairs better with Cookie Monster Cookies than a tall glass of cold milk—it’s a classic for a reason! For a party platter, serve them alongside other blue-themed treats, or offer a spread of fresh fruit and vanilla ice cream for a fun and balanced dessert table. The combination of creamy, fruity, and cookie flavors is always a hit.
Creative Ways to Present
Take your Cookie Monster Cookies to the next level by stacking them in a tower, arranging them in a monster-shaped pattern, or using them as edible cupcake toppers. For birthdays, wrap each cookie in a cellophane bag tied with a blue ribbon for an adorable party favor. They’re also perfect for themed dessert boxes or as a surprise lunchbox treat.
Make Ahead and Storage
Storing Leftovers
Keep your Cookie Monster Cookies fresh and chewy by storing them in an airtight container at room temperature. They’ll stay delicious for up to five days—if you can resist eating them all before then! Slip a slice of bread into the container to help maintain their soft texture.
Freezing
These cookies freeze beautifully, both baked and unbaked. For baked cookies, let them cool completely, then layer them between sheets of parchment paper in a freezer-safe container. For unbaked dough, shape into balls and freeze on a tray before transferring to a zip-top bag. Either way, they’ll keep for up to three months and taste just as fresh when thawed.
Reheating
To bring back that just-baked magic, pop a Cookie Monster Cookie in the microwave for 10–15 seconds. If you’re reheating a whole batch, a few minutes in a low oven (around 300°F) will do the trick. The cookies will be soft, gooey, and as irresistible as the day you made them.
FAQs
Can I use regular food coloring instead of gel?
You can, but gel food coloring is highly recommended for Cookie Monster Cookies. It gives a vibrant blue without making the dough runny, so you get that bold color and perfect texture every time.
What if I don’t have candy eyeballs?
No worries! The cookies are just as delicious without them. You can substitute with chocolate chips for eyes, or simply skip this step and let the cookies’ playful color and mix-ins shine.
Can I make these cookies gluten-free?
Absolutely! Swap in your favorite gluten-free all-purpose flour blend. Just keep an eye on texture and add a splash of milk if the dough feels too dry, since some blends absorb more moisture.
How do I get the perfect chewy texture?
The secret is to avoid overbaking—pull the cookies from the oven when the edges are set but the centers still look slightly underdone. They’ll firm up as they cool, giving you that dreamy chewiness every time.
Can I double the recipe for a crowd?
Yes! Cookie Monster Cookies are the ultimate party treat, and this recipe doubles beautifully. Just be sure to mix the dough thoroughly and rotate your baking sheets halfway through for even results.
Final Thoughts
If you’re looking for a cookie that’s as fun to make as it is to eat, you can’t go wrong with Cookie Monster Cookies. They’re the perfect blend of nostalgia, whimsy, and pure chocolatey goodness. Gather your favorite people, whip up a batch, and watch the smiles appear—these cookies are sure to become a new family favorite!
Print
Cookie Monster Cookies Recipe
- Total Time: 27 minutes
- Yield: 24 cookies 1x
- Diet: Vegetarian
Description
These Cookie Monster Cookies are delightful, chewy blue cookies packed with mini chocolate chips, crushed chocolate chip cookies, Oreos, and mini Chips Ahoy for a fun and flavorful treat. Perfect for themed parties or just because, their vibrant blue color and optional candy eyeballs make them visually playful and irresistibly tasty.
Ingredients
Wet Ingredients
- 1 cup unsalted butter (softened)
- 1 cup brown sugar
- 1/2 cup granulated sugar
- 2 large eggs
- 1 tablespoon vanilla extract
- Blue gel food coloring (as needed for desired shade)
Dry Ingredients
- 2 ½ cups all-purpose flour
- 1 teaspoon baking soda
- 1/2 teaspoon salt
Add-ins
- 1 cup mini chocolate chips
- 1/2 cup crushed chocolate chip cookies
- 1/2 cup crushed Oreos
- 1/2 cup mini Chips Ahoy or other mini cookies (whole or halved)
Optional Decoration
- Candy eyeballs
Instructions
- Preheat and Prepare: Preheat your oven to 350°F (175°C) and line two baking sheets with parchment paper for easy removal and cleanup.
- Cream Butter and Sugars: In a large mixing bowl, cream the softened butter with brown sugar and granulated sugar until the mixture is light and fluffy, about 2 to 3 minutes. This step incorporates air, giving the cookies a nice texture.
- Add Eggs and Flavorings: Add eggs one at a time, mixing well after each addition to incorporate them fully. Stir in the vanilla extract and blue gel food coloring until the dough is evenly colored.
- Combine Dry Ingredients: In a separate bowl, whisk together the all-purpose flour, baking soda, and salt. Gradually add these dry ingredients to the wet mixture, mixing just until combined to avoid overdeveloping gluten.
- Fold in Mix-ins: Gently fold mini chocolate chips, crushed chocolate chip cookies, crushed Oreos, and mini Chips Ahoy cookies into the dough, ensuring an even distribution without overmixing.
- Scoop and Decorate: Using a tablespoon or small cookie scoop, portion the dough into 2-tablespoon-sized balls and place them on the prepared baking sheets about 2 inches apart. Press a few mini cookies and candy eyeballs onto the tops of each dough ball if desired.
- Bake: Bake the cookies for 10 to 12 minutes, or until the edges are set but the centers remain slightly underbaked. This ensures a chewy texture.
- Cool: Let the cookies cool on the baking sheet for 5 minutes to firm up, then transfer them to a wire rack to cool completely before serving.
Notes
- For a chewier cookie, avoid overbaking and take them out once edges are set but centers are soft.
- The blue gel food coloring can be adjusted to get your preferred shade of blue.
- If candy eyeballs are not available, the cookies are still delicious and fun without them.
- These cookies are perfect for birthday parties, themed events, or as a fun treat for kids.
- Store cookies in an airtight container at room temperature for up to 5 days.
- Prep Time: 15 minutes
- Cook Time: 12 minutes
- Category: Dessert
- Method: Baking
- Cuisine: American
Nutrition
- Serving Size: 1 cookie
- Calories: 210
- Sugar: 15g
- Sodium: 120mg
- Fat: 10g
- Saturated Fat: 6g
- Unsaturated Fat: 3g
- Trans Fat: 0g
- Carbohydrates: 28g
- Fiber: 1g
- Protein: 2g
- Cholesterol: 30mg