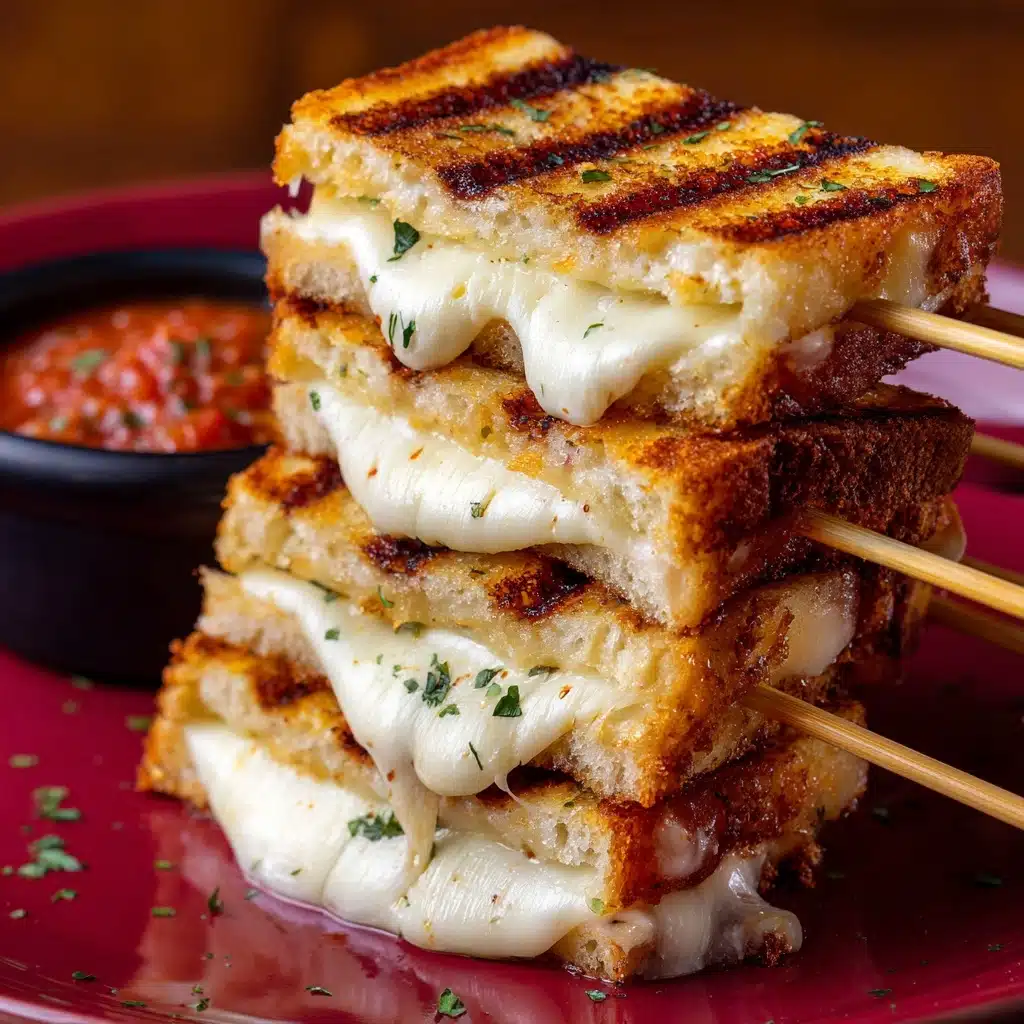
Grilled Cheese Skewers Recipe
Grilled Cheese Skewers are what happens when you take everything you love about classic comfort food and transform it into a playful, party-ready snack. Imagine golden, buttery cubes of melty cheddar-grilled bread, stacked on skewers and paired with bursts of fresh tomato or crispy bacon. They’re a dream come true for cheese lovers, an instant crowd-pleaser for gatherings, and such a delightful twist on the traditional sandwich that you’ll want to make them even on an ordinary afternoon.
Ingredients You’ll Need
Ingredients You’ll Need
You only need a handful of familiar ingredients to whip up these irresistible Grilled Cheese Skewers. Each element is thoughtfully chosen—bread gives structure and crunch, sharp cheddar melts just so, while creamy butter ensures every bite is toasty and rich. Optional add-ins bring color and extra flavor flair!
- White or sourdough bread (8 slices): Choose bread with some structure for the best crispy edges and easy skewering.
- Sharp cheddar cheese (8 oz, sliced): Sharp cheddar brings that classic tangy melt and pulls apart beautifully with every bite.
- Unsalted butter (2 tbsp, softened): Spreads easily and guarantees a golden, fragrant crust on each cube.
- Optional: cherry tomatoes: Add sweet juiciness and an eye-catching pop of red between your grilled cheese bites.
- Optional: cooked bacon pieces: For a smoky, savory twist, tuck bits of crispy bacon onto your skewers.
- Optional: fresh basil: A few fresh leaves add vibrant color and a fragrant, herby finish that’ll wow your guests.
How to Make Grilled Cheese Skewers
Step 1: Prep the Bread and Cheese
Start by gathering your ingredients and making sure your butter is at room temperature—it really does make a difference when spreading! Lay out the bread and slice your cheddar so it fits the bread snugly without overhanging (those little details help everything brown perfectly later).
Step 2: Build and Grill Your Sandwiches
Butter one side of every bread slice generously. Place half the bread, butter side down, onto a preheated skillet over medium heat. Cover each slice with a hearty layer of cheddar, then top with the remaining bread, butter side up. Let them sizzle until golden on the bottom, about 2–3 minutes, then flip and cook the other side until that cheese is irresistibly gooey.
Step 3: Cool and Cut Into Cubes
Once your grilled cheese sandwiches are cooked, move them to a cutting board. Give them a minute to cool slightly—this helps the cheese set just enough so you can slice them cleanly. After a short wait, cut each sandwich into 1-inch cubes.
Step 4: Thread the Skewers
Here comes the fun part: assembling the Grilled Cheese Skewers! Thread the grilled cheese cubes onto skewers, alternating with cherry tomatoes, bits of cooked bacon, or fresh basil if you like. Mixing and matching these extras turns every skewer into a flavor adventure and a mini work of art.
Step 5: Serve and Enjoy
Serve your skewers while they’re still warm for that perfect melty center and crispy exterior. These are unbelievably good with a bowl of tangy tomato soup or your favorite dipping sauce on the side. Watch them disappear—trust me, nobody can eat just one!
How to Serve Grilled Cheese Skewers
Garnishes
You can dress up your Grilled Cheese Skewers with a flourish of fresh basil leaves, a sprinkle of flaky sea salt, or even a dusting of grated parmesan for extra savoriness. If you want to make them extra festive, try a drizzle of good olive oil or a shake of chili flakes.
Side Dishes
Tomato soup is a classic partner, but don’t stop there! These skewers also welcome sides like crisp green salads, pickles, or herby potato chips. The idea is to offer a balance—a little freshness or crunch alongside the gooey richness.
Creative Ways to Present
Stand Grilled Cheese Skewers upright in a mason jar or drinking glass for a fun, bouquet-like look. For appetizers, arrange them on a platter layered with fresh greens and tomatoes, or let guests build their own with a skewer station stocked with all the extras and dips.
Make Ahead and Storage
Storing Leftovers
If you find yourself with leftover Grilled Cheese Skewers (a rare occasion!), tuck them into an airtight container in the fridge. They’ll keep well for up to two days, but are definitely best enjoyed fresh for that unbeatable crispy texture.
Freezing
You can freeze grilled cheese cubes before assembling onto skewers. Once the sandwiches are grilled and cooled, cut them, arrange in a single layer on a baking sheet, and freeze until solid. Transfer to a freezer bag for up to one month. Assemble onto skewers and reheat directly from frozen for convenience!
Reheating
To recapture that fresh-from-the-skillet magic, reheat in a toaster oven or air fryer at 350°F for 5-8 minutes until the cheese is melty and the outsides are crisp again. Microwaving works in a pinch but will make the bread softer.
FAQs
Can I use different types of cheese in Grilled Cheese Skewers?
Absolutely! Try Monterey Jack for extra meltiness, Havarti for buttery richness, or pepper jack if you want a bit of heat. Mixing a couple of cheeses can add new flavors and gooey texture.
Do I need special skewers or will toothpicks work?
Standard wooden or metal skewers work best for threading bigger cubes, but toothpicks are fantastic for bite-sized, appetizer-style portions. If using wooden skewers, soak them briefly in water to avoid burning if you’re reheating under a broiler.
Can I make these in advance for a party?
Definitely! Assemble your grilled cheese cubes and extras on skewers a few hours ahead and store in the fridge. For the best texture, reheat just before serving so the bites are warm and crisp.
What’s the best way to serve Grilled Cheese Skewers to kids?
Kids love interactive food! Offer toppings like cut veggies, small pickles, or a few fun dipping sauces so they can build their own skewers or dunk them just how they like.
Are Grilled Cheese Skewers vegetarian?
They are fully vegetarian as long as you skip the bacon add-in. The core ingredients—bread, cheese, butter—are all vegetarian-friendly, and you can pile on more veggies for extra color and nutrition.
Final Thoughts
Go ahead and treat yourself (and your loved ones!) to something a little special and a lot of fun. Grilled Cheese Skewers are sure to bring out smiles, start conversations, and make any occasion feel truly memorable. Let your creativity shine and enjoy every gooey, toasty bite!
Print
Grilled Cheese Skewers Recipe
- Total Time: 20 minutes
- Yield: 8 skewers 1x
- Diet: Non-Vegetarian
Description
These Grilled Cheese Skewers are a fun twist on the classic grilled cheese sandwich, perfect for parties or a playful lunch. Cubes of gooey cheddar cheese sandwiched between crispy bread cubes, threaded onto skewers for easy snacking.
Ingredients
Bread:
- 8 slices white or sourdough bread
Cheese:
- 8 oz sharp cheddar cheese, sliced
Others:
- 2 tbsp unsalted butter, softened
- Optional: cherry tomatoes, cooked bacon pieces, or fresh basil for threading
Instructions
- Preheat the Skillet: Preheat a skillet or griddle over medium heat.
- Butter and Assemble: Butter one side of each bread slice. Place half the slices butter-side down in the skillet, then top each with cheddar cheese and a second slice of bread, butter-side up.
- Cook: Cook until golden brown on both sides and cheese is melted, about 2–3 minutes per side. Transfer to a cutting board and let cool slightly.
- Thread: Slice each grilled cheese into 1-inch cubes. Thread the cubes onto skewers, alternating with optional add-ins like cherry tomatoes, bacon, or basil if desired.
- Serve: Serve warm with tomato soup or dipping sauce on the side.
Notes
- Use a panini press for more even browning if available.
- These are perfect for parties, lunchboxes, or as a fun side to soup.
- Prep Time: 10 minutes
- Cook Time: 10 minutes
- Category: Appetizer
- Method: Stovetop
- Cuisine: American
Nutrition
- Serving Size: 1 skewer
- Calories: 220
- Sugar: 2 g
- Sodium: 360 mg
- Fat: 13 g
- Saturated Fat: 7 g
- Unsaturated Fat: 5 g
- Trans Fat: 0 g
- Carbohydrates: 18 g
- Fiber: 1 g
- Protein: 8 g
- Cholesterol: 30 mg