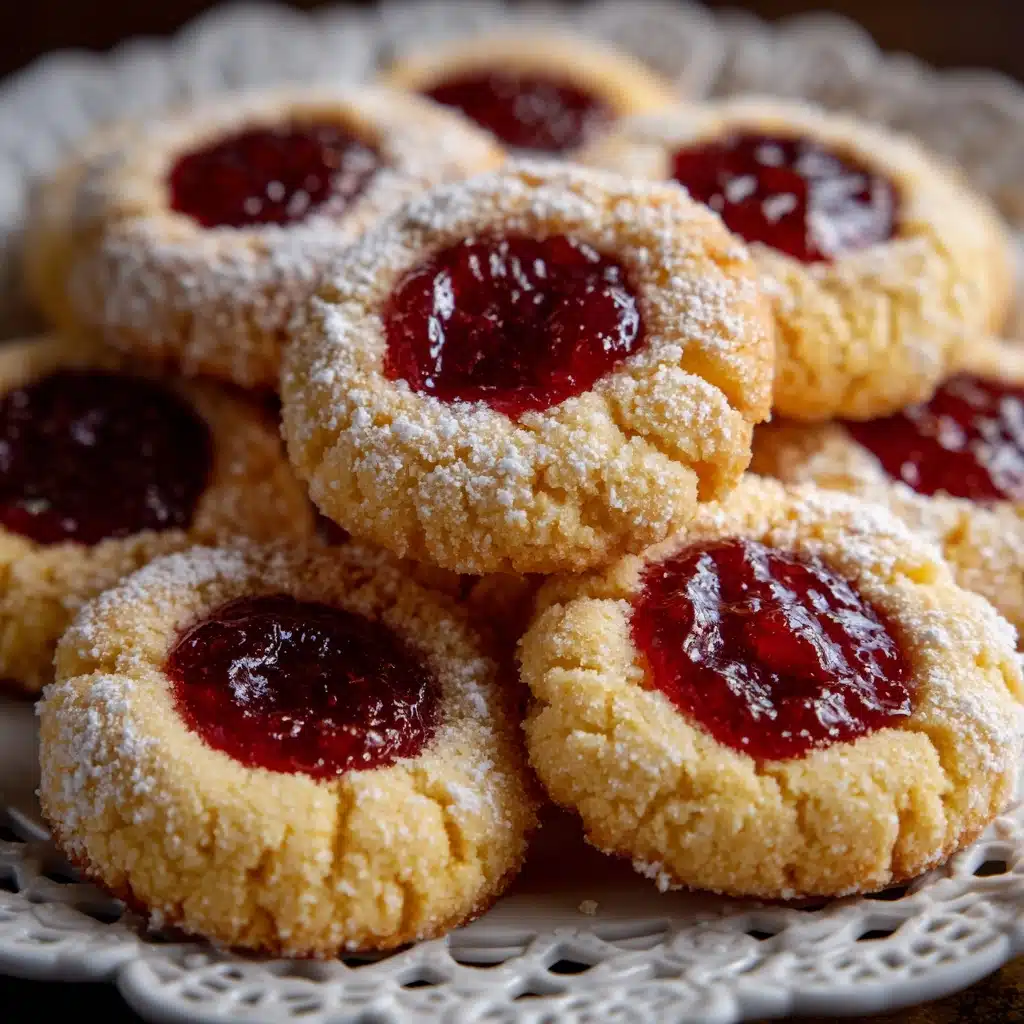
Thumbprint Cookies Recipe
There’s something wonderfully nostalgic about pulling a tray of Thumbprint Cookies out of the oven, the sweet scent of buttery dough and bright fruit jam wafting through the kitchen. These cookies are cheerful little gems, each bite delivering a tender, melt-in-your-mouth texture and a pop of vibrant flavor. Whether you’re whipping up a batch for a holiday party, afternoon tea, or simply to brighten someone’s day, Thumbprint Cookies are an irresistible classic that sparks joy and never goes out of style.
Ingredients You’ll Need
The beauty of Thumbprint Cookies lies in their simplicity. Every ingredient works hard to create that perfect soft crumb, golden color, and signature fruity center. Here’s what you’ll need and why each one matters:
- Unsalted butter (1 cup, softened): The secret to rich, tender cookies! Make sure your butter is at room temperature for easy mixing.
- Granulated sugar (2/3 cup): Adds just the right amount of sweetness and helps create a light, crisp texture.
- Egg yolks (2 large): Bring extra richness and a luscious mouthfeel to each bite.
- Vanilla extract (1 teaspoon): Infuses a warm, inviting aroma that makes these cookies so comforting.
- All-purpose flour (2 cups): The sturdy foundation—it holds everything together and ensures that signature crumbly bite.
- Salt (1/4 teaspoon): Just a pinch to balance the sweetness and enhance all the flavors.
- Fruit jam or preserves (1/2 cup; raspberry, apricot, or strawberry): The vibrant heart of every cookie! Choose your favorite for a personalized touch.
- Powdered sugar (1/4 cup, optional, for dusting): A delicate finish for bakery-style elegance and a subtle sweetness.
How to Make Thumbprint Cookies
Step 1: Prepare Your Oven and Baking Sheets
Begin by preheating your oven to 350°F (175°C). Line two baking sheets with parchment paper—this keeps the cookies from sticking and makes cleanup a breeze! Having everything ready to go sets the stage for a fun and fuss-free baking experience.
Step 2: Cream Butter and Sugar
In a large mixing bowl, use a hand mixer or stand mixer to beat the softened butter and granulated sugar until the mixture is pale and fluffy. This step introduces air, ensuring your Thumbprint Cookies will be tender with that craveable melt-in-your-mouth bite.
Step 3: Add Egg Yolks and Vanilla
Mix in the egg yolks and vanilla extract until everything is well combined. These ingredients not only add flavor but also help the dough come together smoothly while enriching each cookie’s golden color.
Step 4: Mix in Dry Ingredients
Gradually add the all-purpose flour and salt to the wet mixture, stirring until a soft, cohesive dough forms. You might need to use your hands toward the end—don’t be afraid to get a little hands-on!
Step 5: Shape the Cookies
Scoop the dough into 1-inch balls and roll them gently between your palms. Place the dough balls on your lined baking sheets, spacing them about 2 inches apart. This gives plenty of room for even baking and that signature cookie shape.
Step 6: Add the Thumbprints and Fillings
Now comes the fun part that gives Thumbprint Cookies their name! Use your thumb or the back of a small spoon to make a gentle indentation in the center of each dough ball. Fill each indentation with about 1/2 teaspoon of your chosen fruit jam or preserves for a colorful, flavorful burst.
Step 7: Bake to Perfection
Pop the cookies into your preheated oven and bake for 12 to 14 minutes, until the edges just start to turn lightly golden. Resist the urge to overbake—they should be delicately soft in the middle. Let them cool on the baking sheets for about 5 minutes before transferring to a wire rack to finish cooling completely.
Step 8: Dust and Serve
If you like a touch of elegance, dust your cooled Thumbprint Cookies with powdered sugar before serving. The snowy finish makes them look straight out of a bakery window and adds a subtle sweetness that rounds out every bite.
How to Serve Thumbprint Cookies

Garnishes
Sprinkle a light dusting of powdered sugar over your cooled cookies for an irresistibly pretty touch, or scatter a few finely chopped nuts on top of the jam centers before baking for extra crunch and flavor. Sometimes a small mint leaf makes a charming accent too.
Side Dishes
Thumbprint Cookies pair beautifully with a steaming mug of coffee, a delicate pot of tea, or even a tall glass of cold milk. For a festive dessert platter, serve alongside chocolate truffles, shortbread, or your favorite holiday bars—they complement almost anything!
Creative Ways to Present
For special occasions, arrange your cookies on a colorful tiered tray, tuck a few into small gift boxes lined with wax paper, or wrap stacks in cellophane with a ribbon for a heartfelt homemade gift. Grouping Thumbprint Cookies with a mix of other classic treats makes for a jaw-dropping dessert spread.
Make Ahead and Storage
Storing Leftovers
Once completely cooled, store your Thumbprint Cookies in an airtight container at room temperature. They’ll stay freshest for up to five days—if they last that long! Separate layers with parchment paper to keep the jam centers neat and prevent sticking.
Freezing
You can freeze these cookies baked or unbaked. For baked cookies, place them in a single layer on a tray to freeze, then transfer to a freezer-safe bag or container for up to three months. For unbaked dough balls, freeze without jam, then add the jam right before baking for the freshest flavor.
Reheating
If you love a warm cookie, pop a few Thumbprint Cookies in the oven at 300°F for 3–5 minutes. This refreshes the texture and brings the jam back to life, making them taste almost freshly baked!
FAQs
Can I use a different type Dessert
While all-purpose flour gives the best balance of tenderness and structure, you can experiment with a cup-for-cup gluten-free blend. Just know the texture may change slightly, but the cookies will still be delicious.
What kind of jam works best in Thumbprint Cookies?
Thicker jams or preserves like raspberry, apricot, or strawberry hold up beautifully without running. You can get creative with lemon curd, cherry preserves, or even chocolate for a little variety.
Why did my cookies spread too much?
If your dough was too warm or soft, the cookies may spread more than expected. Chill the dough for 30 minutes before shaping to help them keep their shape during baking.
Can I make these cookies without eggs?
Yes! You can try substituting egg yolks with 2 tablespoons of milk or a commercial egg replacer. The texture will be slightly different, but you’ll still get that classic Thumbprint Cookie bite.
How do I keep the jam from oozing out?
Don’t overfill the indentations—about 1/2 teaspoon is just right. Using a slightly thicker jam and allowing the cookies to cool before moving them will help everything stay perfectly in place.
Final Thoughts
If you’re looking for a treat that delivers big on nostalgia and flavor, Thumbprint Cookies are always a winning choice. They’re just the right mix of comforting and delightful, with plenty of room for creativity in their fillings and toppings. Give this recipe a try and watch these cookies become a fast favorite in your own home!
Print
Thumbprint Cookies Recipe
- Total Time: 29 minutes
- Yield: 24 cookies 1x
- Diet: Vegetarian
Description
These classic thumbprint cookies are a delightful treat perfect for any occasion. A buttery cookie base filled with your favorite fruit jam, dusted with powdered sugar, and bursting with flavor.
Ingredients
Cookies:
- 1 cup unsalted butter, softened
- 2/3 cup granulated sugar
- 2 large egg yolks
- 1 teaspoon vanilla extract
- 2 cups all-purpose flour
- 1/4 teaspoon salt
Filling:
- 1/2 cup fruit jam or preserves (raspberry, apricot, or strawberry)
- 1/4 cup powdered sugar (optional, for dusting)
Instructions
- Preheat the oven: Preheat the oven to 350°F (175°C) and line two baking sheets with parchment paper.
- Cream butter and sugar: In a large mixing bowl, cream together butter and sugar until light and fluffy.
- Add eggs and vanilla: Beat in egg yolks and vanilla.
- Mix in dry ingredients: Gradually add flour and salt, mixing until a soft dough forms.
- Shape the cookies: Scoop dough into 1-inch balls and place on prepared baking sheets about 2 inches apart. Make an indentation in the center of each cookie.
- Add filling: Fill each indentation with jam.
- Bake: Bake for 12 to 14 minutes until edges are golden.
- Cool and serve: Cool on baking sheets for 5 minutes before transferring to a wire rack. Dust with powdered sugar if desired.
Notes
- For extra flavor, roll the dough balls in chopped nuts before baking.
- Vary the filling with lemon curd, chocolate ganache, or caramel.
- Store cookies in an airtight container at room temperature for up to 5 days.
- Prep Time: 15 minutes
- Cook Time: 14 minutes
- Category: Dessert
- Method: Baking
- Cuisine: American, European
Nutrition
- Serving Size: 1 cookie
- Calories: 120
- Sugar: 7 g
- Sodium: 40 mg
- Fat: 6 g
- Saturated Fat: 4 g
- Unsaturated Fat: 2 g
- Trans Fat: 0 g
- Carbohydrates: 15 g
- Fiber: 0 g
- Protein: 1 g
- Cholesterol: 25 mg