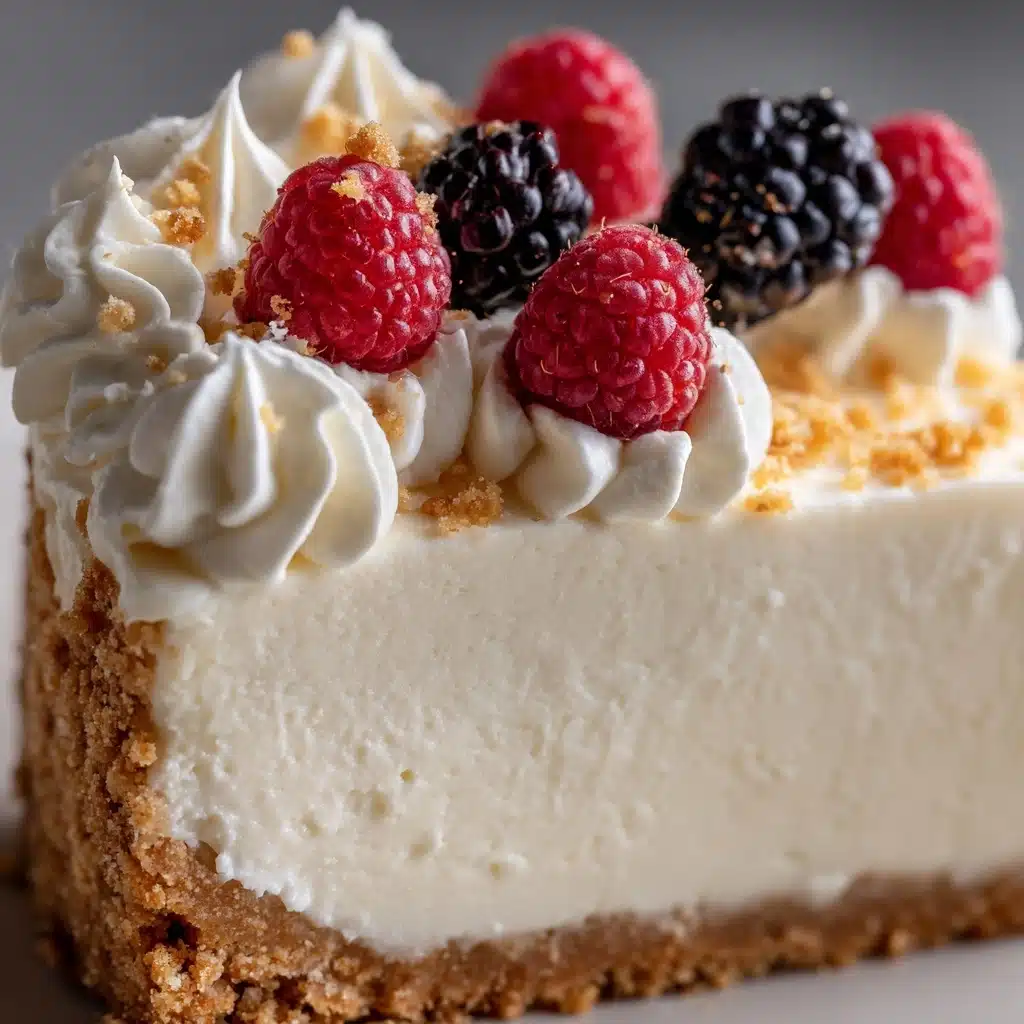
No-Bake Woolworth Icebox Cheesecake Recipe
If you’re craving a nostalgic dessert that’s light, tangy, and impossibly creamy, the No-Bake Woolworth Icebox Cheesecake is about to become your new favorite treat. This vintage recipe captures the heart of classic American diners, combining a zesty lemony filling with a buttery graham cracker crust—all without turning on your oven. It’s the perfect make-ahead dessert for special occasions or weekday cravings, and every bite will transport you straight back to simpler, sweeter times.
Ingredients You’ll Need
The beauty of this No-Bake Woolworth Icebox Cheesecake is in its simplicity—each ingredient brings its own flair, from creamy richness to bright citrus notes and a satisfying crunch. Don’t be tempted to swap or skip anything; these basics work magic together!
- Lemon gelatin (1 (3 oz) package): Gives the cheesecake its signature zesty flavor and that lovely, slightly bouncy texture.
- Boiling water (1 cup): Dissolves the gelatin and helps blend all the flavors together smoothly.
- Cream cheese, softened (1 (8 oz) package): The star of the show—provides the classic cheesecake tang and silkiness.
- Granulated sugar (1 cup): Sweetens the filling just enough without overpowering the lemony freshness.
- Vanilla extract (1 teaspoon): Adds warmth and rounds out the flavors beautifully.
- Evaporated milk, well chilled (1 (12 oz) can): Whips up into a fluffy cloud, giving the filling its signature airy lightness.
- Graham cracker crumbs (2 1/2 cups): The classic base and topping, giving every bite a pleasant, sweet crunch.
- Unsalted butter, melted (1/2 cup): Binds the crumbs for a perfect crust and a finishing sprinkle on top.
How to Make No-Bake Woolworth Icebox Cheesecake
Step 1: Dissolve the Lemon Gelatin
Start by pouring the lemon gelatin into a medium bowl, then add the boiling water. Stir well until the gelatin is completely dissolved, then set it aside to cool to room temperature. This step is key to achieving that signature tart flavor and the light, airy set of this cheesecake.
Step 2: Make the Cream Cheese Mixture
In a large mixing bowl, beat the softened cream cheese with the granulated sugar and vanilla extract until the mixture is perfectly smooth and creamy. Take your time here—any lumps in the cream cheese will show up later, so keep mixing until it’s silky.
Step 3: Whip the Evaporated Milk
Pour the well-chilled evaporated milk into another large bowl (the colder, the better!), and whip it on high speed for 3 to 5 minutes. Watch as it transforms from a pale liquid into a thick, fluffy cloud. This is what gives the No-Bake Woolworth Icebox Cheesecake its impossibly light texture.
Step 4: Combine the Fillings
Gently fold the whipped evaporated milk and the cooled lemon gelatin into the cream cheese mixture. Use a spatula and a light hand—you don’t want to deflate all that fluffy goodness. Keep folding until everything is thoroughly combined and the mixture looks pale and airy.
Step 5: Prepare the Graham Cracker Crust
In a small bowl, mix the graham cracker crumbs with the melted butter until every crumb is evenly coated. This buttery blend will form both the crust and the crumbly topping, adding a delightful texture contrast to the creamy filling.
Step 6: Assemble the Cheesecake
Press about two-thirds of the graham cracker mixture firmly into the bottom of a 9×13-inch baking dish to form an even crust. Pour the cheesecake filling over the crust and smooth it out with a spatula. Sprinkle the remaining crumbs evenly over the top for an irresistible finish.
Step 7: Chill and Set
Cover the pan and refrigerate your No-Bake Woolworth Icebox Cheesecake for at least 4 hours—or overnight, if you can wait that long! This gives the filling time to firm up and the flavors to meld beautifully. When you’re ready, slice into squares and serve chilled for the ultimate retro dessert experience.
How to Serve No-Bake Woolworth Icebox Cheesecake

Garnishes
This cheesecake is lovely on its own, but a little flourish can make it extra special. Try a dollop of freshly whipped cream, a twist of lemon zest, or a few fresh berries to add a pop of color and even more flavor to your No-Bake Woolworth Icebox Cheesecake.
Side Dishes
Balance the creamy richness of this dessert with something light and refreshing. A simple fruit salad, a glass of iced tea, or even a scoop of lemon sorbet makes a delightful accompaniment. The cheesecake pairs perfectly with fresh berries or a tart compote as well.
Creative Ways to Present
Take your No-Bake Woolworth Icebox Cheesecake from classic to creative by serving individual portions in mason jars or parfait glasses. For parties, use cookie cutters to cut out fun shapes, or layer the cheesecake filling and crumbs for a stunning trifle effect. Presentation is half the fun!
Make Ahead and Storage
Storing Leftovers
Leftover No-Bake Woolworth Icebox Cheesecake stores beautifully in the refrigerator. Simply cover the dish tightly with plastic wrap or foil, or transfer individual squares to an airtight container. It will stay fresh and delicious for up to 4 days—if it lasts that long!
Freezing
Want to keep your cheesecake even longer? No problem! Slice it into portions, wrap each piece well with plastic wrap, then place them in a freezer-safe bag or container. The cheesecake will keep for up to a month. Just thaw overnight in the refrigerator before serving.
Reheating
Since this is a no-bake dessert, there’s no reheating required. In fact, keeping your No-Bake Woolworth Icebox Cheesecake nice and cold is the secret to its texture. Simply allow frozen slices to thaw in the fridge, then enjoy them chilled straight from the fridge.
FAQs
Can I use a different flavor of gelatin?
Absolutely! While lemon is traditional and gives the cheesecake its signature zing, lime or orange gelatin work beautifully for a fun twist. Just swap them in at a 1:1 ratio for a new flavor profile.
Why won’t my evaporated milk whip?
The secret is in the chill! Make sure your evaporated milk is very cold before whipping—it helps to pop the can in the freezer for 20–30 minutes (but don’t let it freeze). Warm milk simply won’t hold the fluffy volume you need for this recipe.
Can I use low-fat or non-dairy substitutes?
You can experiment with low-fat cream cheese and non-dairy whipped toppings, though the texture and flavor may change. For best results and that classic taste, stick with the ingredients in the original No-Bake Woolworth Icebox Cheesecake.
How far in advance can I make this cheesecake?
This is the perfect make-ahead dessert! You can prepare your No-Bake Woolworth Icebox Cheesecake up to two days in advance. In fact, it often tastes even better after chilling overnight, allowing the flavors to fully develop.
Do I need to grease the baking dish?
There’s no need to grease the dish, as the buttery graham cracker crust prevents sticking. If you want extra insurance, you can line the pan with parchment for easy lifting, but it’s usually not necessary.
Final Thoughts
This No-Bake Woolworth Icebox Cheesecake is more than just a dessert—it’s a sweet slice of nostalgia and pure comfort. Whether you’re sharing it at a family gathering or treating yourself on a quiet afternoon, you’ll love how easy and delicious it is. Give it a try and let this vintage classic become a cherished favorite in your own recipe box!
Print
No-Bake Woolworth Icebox Cheesecake Recipe
- Total Time: 20 minutes plus 4 hours chilling
- Yield: 12 servings 1x
- Diet: Non-Vegetarian
Description
This No-Bake Woolworth Icebox Cheesecake is a classic, vintage American dessert perfect for warm days when you want a smooth, creamy treat without turning on the oven. Featuring a tangy lemon gelatin cheesecake filling atop a buttery graham cracker crust, this easy-to-make recipe comes together quickly and needs just a few hours to chill and set. It’s light, refreshing, and crowd-pleasing – ideal for family gatherings or casual entertaining.
Ingredients
Cheesecake Filling
- 1 (3 oz) package lemon gelatin
- 1 cup boiling water
- 1 (8 oz) package cream cheese, softened
- 1 cup granulated sugar
- 1 teaspoon vanilla extract
- 1 (12 oz) can evaporated milk, well chilled
Crust
- 2 1/2 cups graham cracker crumbs
- 1/2 cup unsalted butter, melted
Instructions
- Dissolve Gelatin: In a medium bowl, dissolve the lemon gelatin in 1 cup of boiling water. Stir well and set aside to cool down to room temperature completely before using.
- Prepare Cream Cheese Mixture: In a large bowl, beat the softened cream cheese, granulated sugar, and vanilla extract until the mixture is smooth and creamy with no lumps.
- Whip Evaporated Milk: In a separate chilled bowl, whip the very cold evaporated milk on high speed until light, fluffy, and doubled in volume, about 3 to 5 minutes.
- Combine Mixtures: Gently fold the whipped evaporated milk and the cooled lemon gelatin into the cream cheese mixture. Use a spatula to incorporate carefully until the filling is evenly mixed and smooth.
- Make Crust: In a small bowl, combine the graham cracker crumbs and melted butter, stirring until the crumbs are fully coated and resemble wet sand.
- Assemble Cheesecake: Press about two-thirds of the crumb mixture firmly into the bottom of a 9×13-inch baking dish to create the crust layer. Pour the cheesecake filling over the crust and spread evenly with a spatula.
- Add Topping: Sprinkle the remaining graham cracker crumb mixture evenly over the top of the filling for a crunchy topping.
- Chill: Cover the dish with plastic wrap or foil and refrigerate for at least 4 hours or until the cheesecake is completely set and firm.
- Serve: Once chilled, slice into 12 squares and serve cold. Enjoy this creamy, tangy treat as a perfect ending to any meal.
Notes
- Make sure the evaporated milk is very cold before whipping to achieve maximum volume and lightness in the filling.
- You can substitute lemon gelatin with lime or orange flavored gelatin for a refreshing flavor variation.
- Press the crust firmly to prevent it from crumbling when slicing the cheesecake.
- If you prefer a slightly firmer topping, briefly chill the crumb topping before sprinkling it on the filling.
- Store leftovers covered in the refrigerator for up to 3 days for best taste and texture.
- Prep Time: 20 minutes
- Cook Time: 0 minutes
- Category: Dessert
- Method: No-Bake
- Cuisine: American
Nutrition
- Serving Size: 1 square (approx. 1/12 of 9×13 inch pan)
- Calories: 310
- Sugar: 20g
- Sodium: 200mg
- Fat: 18g
- Saturated Fat: 9g
- Unsaturated Fat: 7g
- Trans Fat: 0g
- Carbohydrates: 32g
- Fiber: 1g
- Protein: 4g
- Cholesterol: 40mg