Watermelon Mochi Recipe
Watermelon Mochi is the summertime treat you never knew you needed—until now. Imagine biting into a soft, chewy cloud infused with the refreshing sweetness of watermelon juice, with a sprinkle of chocolate chips or sesame “seeds” that fool your eyes and delight your taste buds. Whether you’re hosting a picnic, looking to beat the heat, or simply want to impress your friends with a colorful homemade dessert, this no-fuss mochi is as stunning as it is delicious. Let’s bring a little slice of happy, watermelon-inspired magic into your kitchen!
Ingredients You’ll Need
-
Mochi:
- 1 cup sweet rice flour (mochiko)
- 3/4 cup watermelon juice (freshly blended and strained)
- 1/4 cup granulated sugar
- 1/4 teaspoon vanilla extract
- red or pink food coloring (optional)
For Dusting and Decoration:
- 1/4 cup cornstarch or potato starch
- mini chocolate chips or black sesame seeds (for ‘seeds’)
How to Make Watermelon Mochi
Step 1: Mix the Mochi Batter
Start by whisking together sweet rice flour, granulated sugar, strained watermelon juice, and a splash of vanilla extract in a microwave-safe bowl. If you want that picture-perfect blush of color, add one or two drops of red or pink food coloring. Stir the mixture until it’s silky smooth with no lumps—this is your foundation for the softest, most vibrant Watermelon Mochi.
Step 2: Microwave the Mixture
Loosely cover your bowl with plastic wrap or a microwave-safe plate (to avoid splatters). Microwave on high for one minute, then take it out (careful, it’s hot!) and give everything a quick, thorough stir. Return it to the microwave in 30-second bursts, stirring after each, until the mochi is thick, sticky, and slightly translucent. This usually takes 2 to 3 minutes in total, but don’t overcook—you want a bouncy texture, not rubber!
Step 3: Cool and Prepare Your Work Surface
Let the cooked mochi cool for just a minute or two until it’s comfortable to handle (but not cold). Meanwhile, liberally dust a cutting board or tray with cornstarch or potato starch; this step is essential to prevent sticking and make shaping a breeze.
Step 4: Shape and Decorate
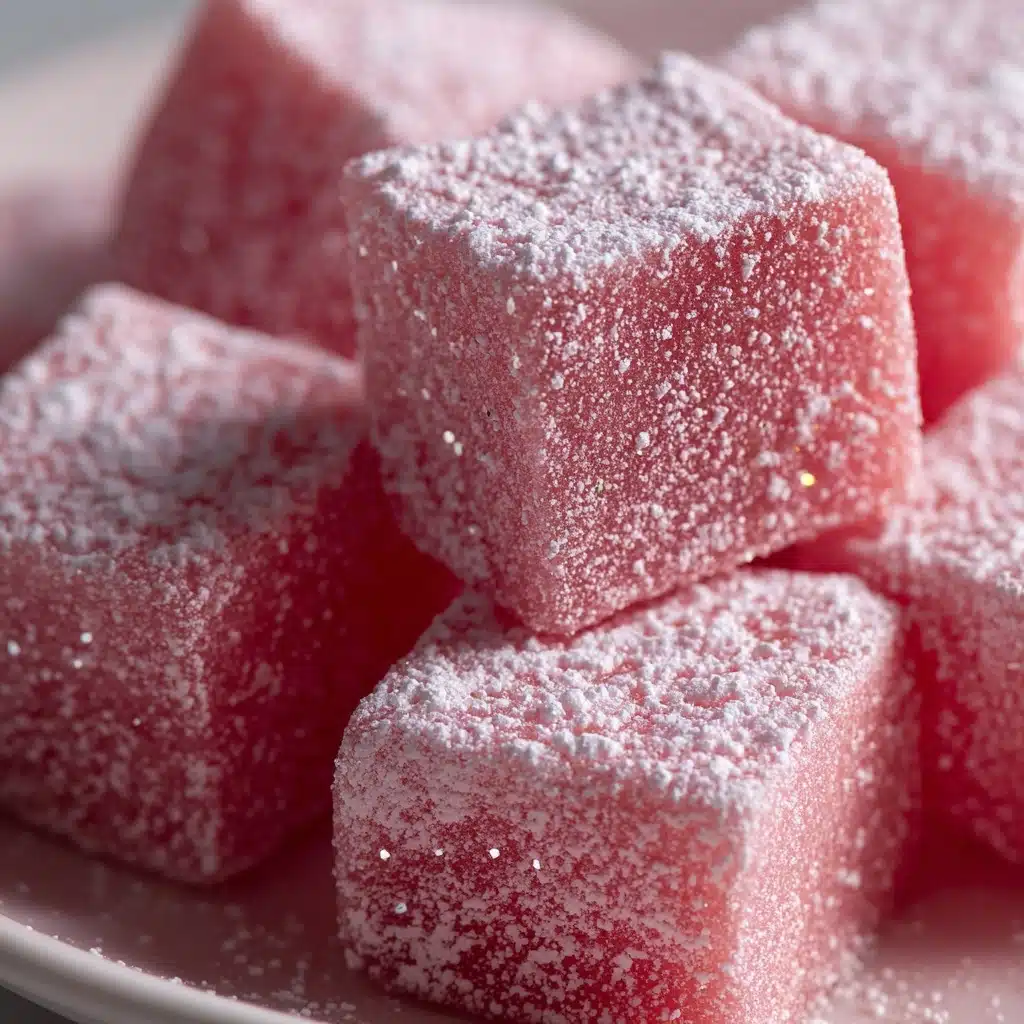
Transfer the mochi onto the prepared surface and dust the top with more starch. Gently press or roll it into a rectangle (about 1/2 inch thick). For the fun part, press mini chocolate chips or black sesame seeds into the surface to mimic those irresistible watermelon seeds. Slice the slab into squares, or use a small round cutter for classic mochi bites. If you’d like to go the extra mile, reserve a bit of mochi, tint it green, and wrap it around for a watermelon rind effect!
Step 5: Coat and Finish
Roll each piece in a bit more starch to coat all sides—this keeps the Watermelon Mochi from sticking and gives it that soft, powdery finish. Let the pieces cool completely on a tray before serving or storing. Now your adorable treats are ready for their big reveal!
How to Serve Watermelon Mochi

Garnishes
Dress up your Watermelon Mochi with a sprinkle of extra chocolate chips, a dusting of powdered sugar, or a few pinches of vibrant green matcha to nod at that classic watermelon rind. You could also arrange edible flowers or fresh mint leaves around your platter for a touch of garden party charm.
Side Dishes
Watermelon Mochi is wonderfully light on its own, but it pairs beautifully with a scoop of coconut ice cream or a fresh fruit salad for a refreshingly cool summer dessert spread. For a contrasting texture, serve it alongside crisp almond cookies or delicate green tea biscuits.
Creative Ways to Present
Set your Watermelon Mochi on a bright platter and alternate the “seeded” pieces with green-rind mochi to mimic a real watermelon slice. Stack them in a checkerboard pattern for a playful look, or skewer individual pieces on toothpicks for easy party snacking. For a show-stopping touch, arrange your mochi atop a big bowl of cubed fresh watermelon and let everyone dive in!
Make Ahead and Storage
Storing Leftovers
Place any leftover Watermelon Mochi in an airtight container, separating layers with wax or parchment paper to keep them from sticking. They’ll stay soft at room temperature for about a day, but for best freshness, especially in warm climates, tuck them into the fridge where they can last 2–3 days without losing their signature chew.
Freezing
Want to enjoy your Watermelon Mochi on a later date? Mochi actually freezes quite well. Arrange pieces on a parchment-lined tray, freeze until firm, then transfer to a zip-top bag or airtight container. When you’re ready, thaw on the counter for 20–30 minutes for that perfect texture.
Reheating
If you find your refrigerated or frozen mochi a little firmer than you’d like, simply let it come to room temperature for a softer bite. You can also microwave a piece (just 5–10 seconds!) to revive that fresh, pillowy texture—but watch carefully so it doesn’t overcook and dry out.
FAQs
Can I make Watermelon Mochi without a microwave?
Absolutely! You can steam the mochi mixture using a heatproof bowl set over simmering water, stirring every few minutes until thick and cooked through. It might take a bit longer than microwaving, but you’ll get equally lovely results.
Is Watermelon Mochi gluten-free?
Yes, it is completely gluten-free! Mochiko, or sweet rice flour, does not contain gluten, so this dessert is safe for gluten-sensitive or celiac guests as long as cross-contamination is avoided.
Can I use store-bought watermelon juice?
You can, but freshly blended and strained juice offers a more vibrant, natural watermelon flavor that really makes the Watermelon Mochi shine. If using store-bought, look for 100 percent watermelon juice with no added sugars or flavors.
What’s the best way to make the “seeds” stick?
For best results, press the mini chocolate chips or sesame seeds gently into the warm mochi immediately after flattening. If the surface seems too powdery from the starch, brush off a little before pressing in the “seeds.”
Can I double the recipe for a crowd?
Definitely! Just be sure to microwave the batter in batches, as larger amounts can cook unevenly. Shaping and decorating the extra mochi can be a fun group activity, especially if you’re hosting a party.
Final Thoughts
If you’re looking to add a splash of color, sweetness, and whimsy to your dessert lineup, you simply have to try making Watermelon Mochi at home. It’s a quick, joy-filled project with delicious results—so go on, get your hands a little sticky, and share the magic with your favorite people!
Print
Watermelon Mochi Recipe
- Total Time: 15 minutes
- Yield: 12 small mochi pieces 1x
- Diet: Vegetarian
Description
Enjoy the refreshing taste of summer with these delightful Watermelon Mochi treats. These chewy, sweet, and colorful treats are perfect for a light dessert or snack.
Ingredients
Mochi:
- 1 cup sweet rice flour (mochiko)
- 3/4 cup watermelon juice (freshly blended and strained)
- 1/4 cup granulated sugar
- 1/4 teaspoon vanilla extract
- red or pink food coloring (optional)
For Dusting and Decoration:
- 1/4 cup cornstarch or potato starch
- mini chocolate chips or black sesame seeds (for ‘seeds’)
Instructions
- Prepare Mochi: In a microwave-safe bowl, whisk together sweet rice flour, sugar, watermelon juice, and vanilla extract until smooth. Microwave in intervals, stirring until thick and translucent. Let cool.
- Shape Mochi: Dust a surface with starch, flatten the mochi, press in ‘seeds,’ and cut into pieces. Coat each piece with starch.
- Optional: For a green rind, color a portion green and wrap it around the pink mochi before shaping. Store as directed.
Notes
- For a fun variation, experiment with different ‘seed’ options like chocolate chips or sesame seeds.
- Ensure mochi is completely cool before serving for the best texture.
- Prep Time: 10 minutes
- Cook Time: 3 minutes
- Category: Dessert
- Method: Microwave
- Cuisine: Japanese
Nutrition
- Serving Size: 1 piece
- Calories: 70
- Sugar: 6g
- Sodium: 2mg
- Fat: 0.5g
- Saturated Fat: 0g
- Unsaturated Fat: 0g
- Trans Fat: 0g
- Carbohydrates: 15g
- Fiber: 0g
- Protein: 0.5g
- Cholesterol: 0mg